A group of experienced adventurers seek out the long-lost vault of the sorcerer X’oran, thought to have sunk with the city of Kharad-Zur in the swamps that now hold the same name. As they face danger both natural and monstrous, the question stands: will recover the treasure alive?
This is the original adventure of the “Shroud” RPG system. The adventure sometimes refers to certain skill checks, but these are more a guideline. If players ask to do something, let them, and decide on the appropriate skill check.
Heroic Points: 5
Introduction
The heroes find themselves in the swamps of Kharad-Zur, searching for the lost vault of the sorcerer X’oran. The vault is unstable and never remains in one place for too long — in fact, once a living creature enters and leaves, it teleports to a new location. Each has their own personal reason for wanting entry into the vault, but as a whole, the group seeks the Auroral Blade — a mighty weapon that they can use against Obsidious Stormrender, the Dragon King of Reynheim. They have been travelling for some weeks now and believe themselves to be in the correct area. Finding it during the day is a good idea since monsters lurk around at night. If they want to press on in the daytime, they will need to make a Fortitude check, and a group success (half or more) means they do indeed make it to the entrance, an outcropping of stone amidst the swampland. Otherwise, they are forced to take a break and wait until nighttime, and the risk of running into monsters is higher.
At nighttime, a giant owl swoops around looking for food. In the trees near the vault, a dire wolf stalks prey. Loud noises, campfires and other ways to alert these creatures can cause them to attack.
The entrance to the vault is guarded by a sphinx. This one stands on its hind legs, has a male lion head and holds a long spear. He says that he guards the way and will only let them in if they find the key. It is nearby in the swamp. An alternative (and potentially deadly) solution, is to fight the sphinx. Once he is bloodied, he will call off the fight and open the way, saying that they have proved themselves strong enough to enter the vault.
Characters that succeed on an Observation check while around the swamp will spot the key to the vault lying in the mire, a stone fragment interlaced with dull blue runes. Characters with Natural Knowledge or Situational Awareness can also roll that here, and a success reveals the presence of giant crocodiles lurking nearby. Though uninterested by the key, they will attack anybody that wades into the deeper swamp.
Once they obtain the key, or once they’ve bested the sphinx in combat, the door will open. He warns them that the next time they leave the vault will be their last, meaning they have a single chance inside to find the Auroral Blade and escape.
The Vault
The vault is a circular maze, with the entrance on the outer ring. It is full of treasure guarded by monsters, lost lore and magical contraptions that guard the Inner Sanctum. Each time the party enters a new room, roll for an encounter.
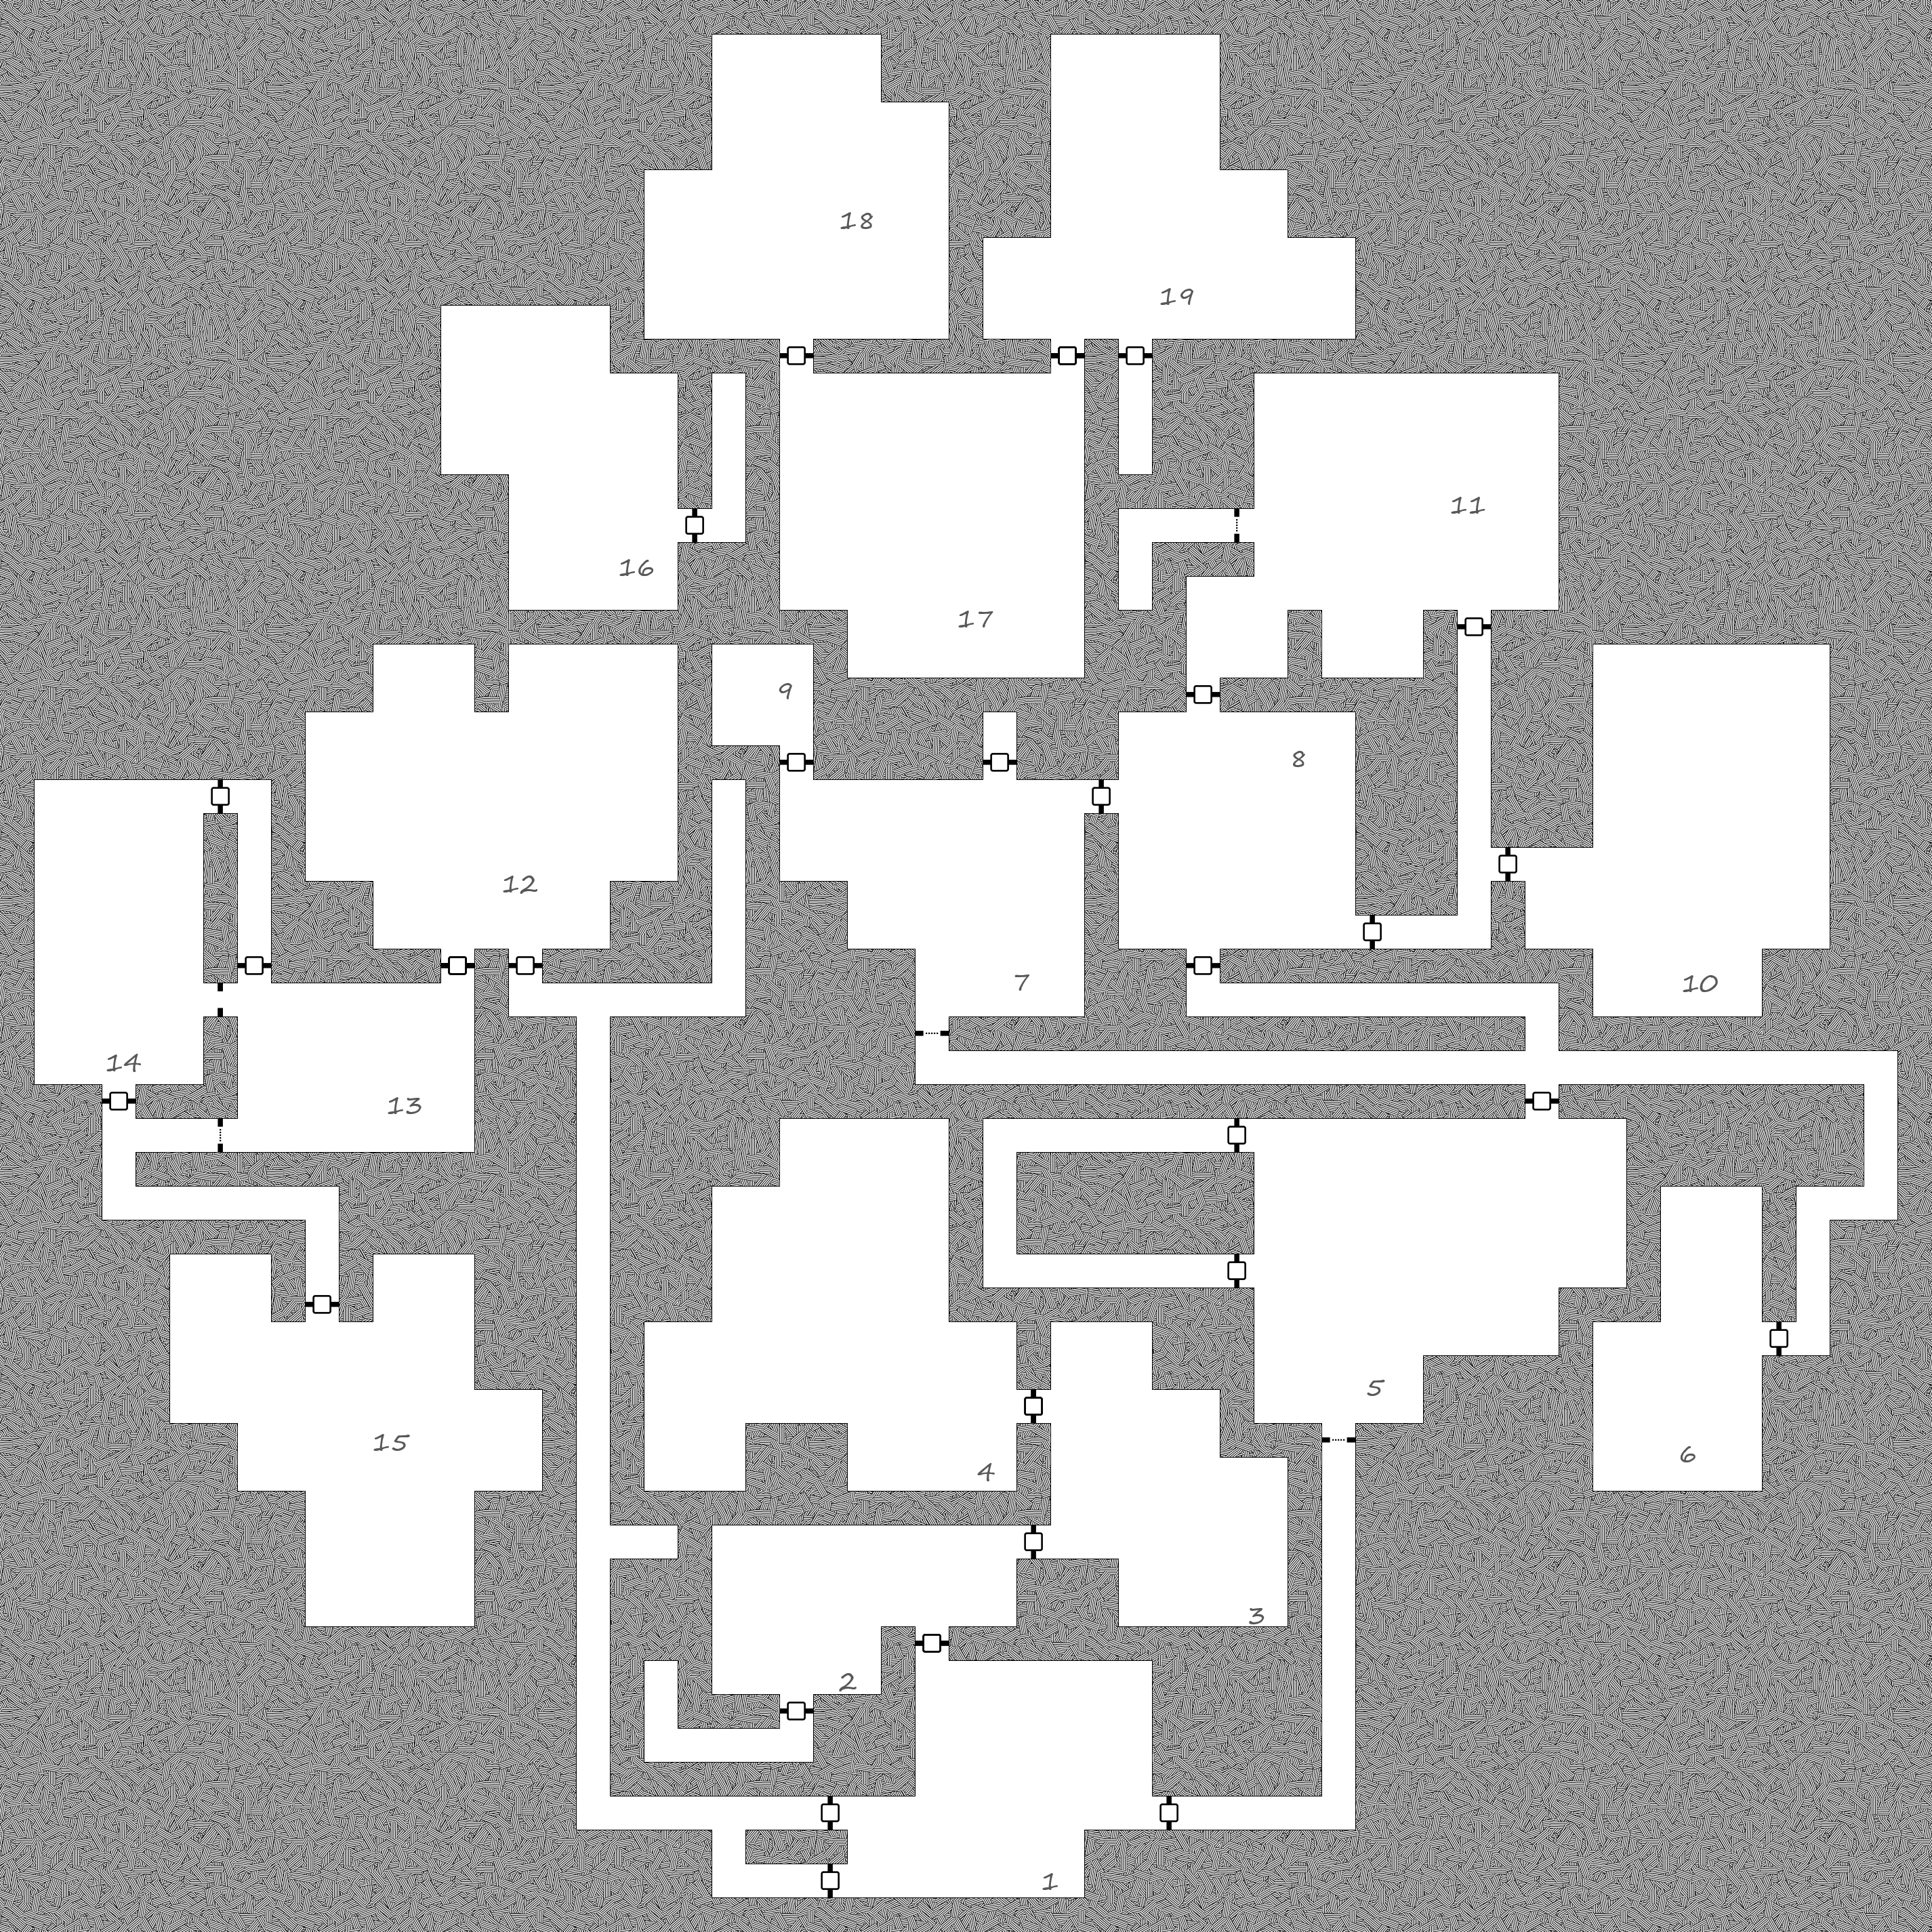
Room-by-room guide:
Room 1: Entrance, dark. Doors to the left are locked, door straight ahead is ajar, door to the right is closed but unlocked. Everybody can hear some rumbling throughout, and an Observation success tells them it is heavy footsteps.
Left doors: These are magically sealed and require the Orbs of Vitality and Wisdom guarded in rooms 10 and 6, respectively. They have an inset sphere designed to hold the orbs, and will not open until both are placed inside.
Room 2: A chamber where X’oran would meet guests. Now, the chairs are broken, the table is rotted and the chandelier has fallen. A few bookcases line the walls, but their contents are mostly destroyed. It is a crossroads of sorts, and also defendable if need be.
Room 3: A small church dedicated to an unknown deity. Investigation yields it to be a shrine to Jeremus, Patron Saint of kings and sorcerers. There is a book here on Ancient Fables of the Fantastic, which is hinting towards King Sebulo and the Night War. The church is a sacred place and can bring back fallen companions, but someone has to give up something dear to them as well.
Room 4: Guarded treasure. Group of dead soldiers, one has the map. Investigation yields scorch marks on their bodies, good investigation shows ashen footsteps walking away. Looks like they’ve been dead a while.
Room 5: Alchemical lab and library with lots of information. There are 2 healing potions here, as well as 3 unknown potions. There are books relating to demonology and the study of dark things. These books will try to lead party members astray as they have a mind of their own. Knowledgeable characters will have to make Willpower checks to avoid being drawn to them, and a failure means gaining an Affliction.
Unknown potions:
- Potion of Levitation (Levitate for 1 minute)
- Potion of Mind Poison (gain 1 Affliction)
- Potion of Weakness (gain 1 Wound)
Room 6: The Orb of Wisdom is placed within a panel mosaic on the far wall in this room. It depicts a scene of midnight combat, with the Orb acting as the moon. Further investigation yields that the mosaic is showing the Night War, a struggle between the civilised kingdoms and the demons. The Orb is well set in the mural, and is also trapped if removed by force, causing the mural to crumble and reveal a sleeping (now woken and angry) owlbear.
The clue is recognising the key figure of King Sebulo giving a speech to his soldiers, and recognising the same figure in Room 9. To release the Orb, one should invoke the words of King Sebulo at the time of the Night War (found on a corpse in Room 9).
Hearing these, the orb will be released, and the owlbear remains in its magical slumber.
Room 7: Blocked route upwards, cave-in.
Room 8: An armoury with arrow refills if necessary as well as new weaponry.
Room 9: Guarded treasure. The words of King Sebulo from the Night War are located on a note found on a corpse dressed in King Sebulo’s attire here: “Victorious warriors win first and then go to war, while defeated warriors go to war first and then seek to win.”
No other mention is made on the note and the skeleton yields no answers. Successful further investigation reveals who wrote those words as well as the context.
The skeleton is holding a Shield of Deflection, a coveted magic item that can be used to reflect projectiles. Careful investigation shows the signs of some sort of pressure plate system on the floor, and the corpse is lying on one.
Moving the corpse will activate the trap and stepping on any of the pressure plate tiles will activate the trap. When active, blades swing out from the walls and cut across the room. Anybody in the room has to roll Fortitude and suffer a Wound if they fail.
Room 10: The Orb of Vitality is located here, guarded jealously by a Nothic that uses it as a lens. The creature has grown to larger proportions due to the orb’s magic, and is also more powerful as a result — but still very nimble. The Nothic can be tricked into giving up the orb, or one could trade with it. Of course, taking it by force is always an option.
Room 11: A large blue crystal is suspended from the ceiling and equipment for studying the arcane (now dusty) is set up around the room. A currently inanimate magical construct chained to the wall. In its chest is a small tube containing the Scripture of Reversal, an incantation that can reverse the flow of time within a small area. It can be used to undo the cave-in at room 7. Attempting to reach into it causes the chest to snap shut (roll Fortitude or suffer a Wound), and combat begins as it breaks its chains.
Investigation yields that the constructs are drawn to magical energy. However, large amounts of it serves to deactivate them as well. The crystal is some sort of power receptor, but is currently inactive. Astute adventurers can attempt to power it on, which also animates the construct; though now it is drawn to the brilliantly shining blue crystal. There are also mirrors set up around the room, and can be set up to point at places in the chamber. Finally, a lever controls the final burst of energy from the crystal. If it hits a construct, that construct will be deactivated. Further investigation shows the crystal only has a single charge of energy left, and also that the energy from the beam will become weaker as a function of distance. But standing too close to the source will be damaging!
There are 3 objects to interact with the light in the room. The first is a beam splitter that splits the beam into the left and right sides. The other 2 objects are mirrors that need to be set up. Note that there are no second chances, everything has to be set up perfectly. One of the mirrors is on a stand, while the other is almost broken and the stand is missing. A character will have to hold the mirror in the right position but risks being damaged by the light. Both beams will have to hit the construct in order to deactivate it. Hitting it with only one energises it instead.
Room 12: A research lab. Notes are strewn about the place. One reads: “The Scripture of Reversal works as intended, but the servants and guards seem drawn to it. Perhaps that is not a bad thing; I’d like to see someone steal it from them. Once the traps are set, I’ll detonate the charges, sealing myself in.”
This hints towards the Scripture being in one of the animated constructs.
Room 13: A lounge area with a fireplace and paintings of historic figures. Hidden behind the one of King Sebulo is a small vault containing some treasure and Boots of Soft Tread. Once a day, can move without making any sound.
Room 14: Guarded treasure. An ivory net spreads throughout the room. Astute characters will also notice hair-thin threads of flexible metal throughout the room — the ambush spot for a Metallic Spider. Treasure is placed throughout the room though, gold, paintings, arrows, etc.
Room 15: Contains the Passwall Key required to move through rooms 12 → 16 → 17. It is suspended in the middle of the room and the air is deathly quiet. There is a Roper on the ceiling, camouflaged with the stone and waiting to grab whoever approaches the Key. Additionally, the floor will begin to collapse as the portcullis door slams shut.
Room 16: Guarded treasure. A sleeping Basilisk curls up around the entrance to 17.
Room 17: Exit to the Inner Sanctum.
Room 18: Treasure hoard containing gold, gems and luxury items.
Room 19: Treasure hoard armoury containing pristine weaponry and some magical equipment (try to have something for every party member present):
- Vaulting Spear
- Staff of Fireballs
- Freezing Arquebus
- Animate Tower Shield
The Inner Sanctum
This perfectly round chamber contains the spirit urn of the sorcerer X’oran and his magical constructs. Once they enter, the door seals behind them. The Auroral Blade hangs from the centre of the chamber, directly above X’oran’s spirit urn. It is suspended by ghostly blue-white shackles which connect to the constructs and the urn as well.
X’oran’s voice calls out from the void, congratulating them on finding this. He laments a bit that his time has finally come to an end and explains that he took it upon himself to guard the weapon and the treasure. He cannot let the Blade fall into weak hands, though. He gives them a choice — leave the vault with whatever treasure they have found, or prove their strength against his constructs.
Once both constructs have been killed, X’oran unseals the door, and bids the heroes farewell, wishing them luck in their struggle. The Auroral Blade falls, its shackles having broken, and cleaves the spirit urn in two. X’oran’s spirit disappears in a bluish-white mist, and the vault rumbles as it begins to sink into the swamp. Cue the escape sequence!